A stand mixer is an invaluable asset in any kitchen, transforming daunting baking tasks into effortless culinary adventures. From kneading resilient doughs to whipping airy meringues, this powerful appliance saves time and muscle. However, with its heavy-duty performance comes the inevitable buildup of grease, flour, and other food residues. Neglecting to clean these accumulations not only compromises hygiene but can also impact your mixer’s performance and lifespan. While traditional dish soap is often the go-to for kitchen cleanup, many wonder how to effectively degrease their stand mixer safely, particularly its electrical components and sensitive finishes, without relying on suds. This guide will navigate you through safe, soap-free cleaning methods to keep your greasy stand mixer sparkling and fully functional.
Stand Mixer: Overview and Benefits
Stand mixers stand as titans of the kitchen, empowering home cooks and professional bakers alike with unparalleled efficiency and versatility. These robust machines eliminate the arduous labor of manual mixing, kneading, and whipping, making complex recipes more accessible and enjoyable. The core benefit lies in their hands-free operation and consistent power, allowing ingredients to be thoroughly incorporated and aerated for perfect results every time. However, this constant engagement with diverse food types, from heavy bread dough to oily batters, means that splatters and grease buildup are an inherent part of their working life, necessitating diligent and effective cleaning practices.
Common Types of Stand Mixers
Understanding the different types of stand mixers can shed light on their cleaning nuances, as various designs present unique challenges and advantages. Each style caters to different needs and can influence how readily you can access areas prone to grease accumulation.
Tilt-Head Stand Mixer
Table is empty.Tilt-head stand mixers are characterized by a head that tilts back, allowing easy access to the bowl and attachments. This design is popular for its user-friendly nature, making it straightforward to add ingredients, scrape down the bowl, and swap out accessories. While generally easy to clean, the hinge mechanism and the underside of the tilting head can become notorious traps for flour dust, dried batter, and greasy splatters, requiring careful attention during maintenance. These mixers are often favored by casual bakers and those with smaller kitchens due to their compact footprint.
Bowl-Lift Stand Mixer
Bowl-lift stand mixers are typically more robust, designed for larger batches and heavy-duty tasks like kneading stiff doughs. Instead of tilting, the mixing bowl locks into place on arms and is then lifted into position by a lever. This design provides greater stability and power, making it a favorite for avid bakers and those preparing food for larger families. The stationary head of a bowl-lift mixer means that grease and food particles primarily accumulate around the bowl-lift arms, the attachment hub, and the motor casing, which often require targeted cleaning methods to ensure thorough sanitation without soap.
Hand Mixer
While not a “stand” mixer, hand mixers are a common alternative for lighter mixing tasks. They are compact, portable, and typically consist of a handheld motor unit with detachable beaters. Their simplicity and small size make them incredibly easy to clean; generally, only the detachable beaters require washing, while the motor unit needs a quick wipe-down. Though they lack the power and capacity of stand mixers, their minimal internal components mean grease buildup is less of a concern for the main unit, making them inherently simpler to maintain without the need for complex, soap-free degreasing strategies.
Comparing Popular Stand Mixer Brands
Choosing a stand mixer often involves weighing features, power, and brand reputation. Different brands offer varying designs, materials, and attachment options, all of which can subtly influence how easily and effectively a greasy stand mixer can be cleaned using non-soap methods. From the iconic KitchenAid to the robust Bosch and versatile Kenwood, each has its distinct characteristics.
Detailed Comparison Table
When evaluating stand mixers, factors like build materials, especially of the housing and attachments, play a critical role in determining the most effective soap-free cleaning approaches. Stainless steel exteriors, for instance, are generally easier to wipe clean of grease compared to textured plastic housings.
| Feature | KitchenAid | Bosch Universal Plus | Kenwood Chef/Major |
|---|---|---|---|
| Power | 250-575 Watts (direct drive) | 500-800 Watts (bottom drive) | 800-1500 Watts (top drive) |
| Capacity | 4.5-7 Quarts | 6.5 Quarts | 4.6-6.7 Liters |
| Material | Die-cast metal, painted enamel finish | Plastic housing, stainless steel bowl | Die-cast aluminum, stainless steel bowl |
| Special Features | Planetary mixing action, power hub for attachments | Open-bowl design, multiple drive shafts | Planetary mixing, high-speed & slow-speed hubs |
| Price | Mid-High | Mid-High | High |
| Overall Review | Durable, aesthetic, vast attachment ecosystem | Powerful for large batches, versatile | Excellent for heavy use, robust, many attachments |
How to Choose the Right Stand Mixer (Buying Guide)
Selecting the perfect stand mixer involves more than just picking a color; it’s about aligning the appliance with your unique culinary lifestyle. The choices you make regarding size, power, and materials will not only dictate its performance but also influence the ease and safety of maintaining a grease-free machine using methods that avoid traditional soap. Consider these aspects to make an informed decision that suits your kitchen and cleaning preferences.
Xác Định Nhu Cầu Sử Dụng
Your baking habits are the first and most crucial consideration when selecting a stand mixer. Do you frequently bake for a large family, or are you an occasional baker who enjoys small batches? The volume and type of recipes you tackle—from airy whipped creams to dense bread doughs—will dictate the necessary power and bowl capacity. For instance, consistent bread making demands a more powerful motor and larger bowl, factors that contribute to greater grease accumulation but also ensure the mixer’s longevity through proper, targeted cleaning.
Các Yếu Tố Cần Quan Tâm
When making your choice, several factors come into play, each with implications for cleaning. The motor power (wattage) affects how efficiently the mixer handles dense ingredients, and thus how much strain—and potential grease splatter—it endures. The bowl capacity should match your typical batch sizes. Material is paramount: stainless steel bowls and coated attachments are often easier to clean, while burnished aluminum requires specific care to prevent oxidation. Look for variable speeds and accessory compatibility, which add versatility. Consider the noise level during operation and the brand’s reputation for reliability and warranty. Finally, price and design should align with your budget and kitchen aesthetics, but always prioritize robust construction that facilitates effective, soap-free maintenance over superficial appeal.
Mastering Soap-Free Cleaning for Your Greasy Stand Mixer
Maintaining a stand mixer free from grease and grime, especially without harsh soaps, ensures its longevity and hygienic operation. This section provides a comprehensive guide to safely degreasing your appliance using effective, non-suds methods. Prioritizing electrical safety and understanding material-specific care are key to successful soap-free cleaning.
> “For delicate finishes and electrical components, gentle, non-abrasive, and soap-free methods are paramount to prevent damage and ensure years of reliable service.” – Dr. Elara Vance, Food Science and Appliance Care Specialist
Preparing for a Pristine Clean
Before you begin any cleaning, safety must be your absolute priority. Always ensure the mixer is completely unplugged from the power outlet to prevent any electrical hazards. Next, meticulously detach all removable parts, including the mixing bowl, beaters, dough hooks, wire whips, and any pouring shields. An initial dry wipe with a clean microfiber cloth can effectively remove loose flour, crumbs, and surface dust, making subsequent grease-fighting steps more efficient and preventing debris from turning into muddy residue when liquids are introduced.
The Main Unit: Grease-Fighting Without Suds
Cleaning the main body of your stand mixer, which houses the motor and electrical components, requires particular care, and avoiding traditional soap is crucial to protect its finish and internal mechanisms.
- Damp Cloth (Warm Water): For light grease and everyday splatters, a soft cloth dampened with warm water is often sufficient. Gently wipe down the entire exterior, focusing on areas with visible grime. This method is perfect for routine cleaning after each use to prevent grease from hardening.
- Vinegar and Rubbing Alcohol Solution: For a more potent, soap-free degreasing agent, create a DIY spray. Mix 1 cup of warm water, 1 cup of rubbing alcohol, and 1 tablespoon of white vinegar in a spray bottle. Lightly mist this solution onto a clean cloth (never directly onto the mixer) and wipe down greasy surfaces. The alcohol aids in evaporation, and vinegar acts as a natural degreaser, breaking down oil without leaving a film.
- Baking Soda Paste: For stubborn, caked-on grease spots or dried splatters, a paste of baking soda and a small amount of water can work wonders. Apply the paste to the affected area, let it sit for 5-10 minutes, then gently scrub with a soft cloth or an old toothbrush. Wipe away the residue with a damp cloth, followed by a dry one. This method is effective without being abrasive to most mixer finishes.
- Window Cleaner (Optional, for Tough Oil): In cases of particularly greasy patches that warm water or the vinegar solution struggle with, a mild, ammonia-free window cleaner applied to a cloth can be used. Many window cleaners are formulated to cut through grease and dry without leaving a residue, making them a suitable alternative to soap for occasional deep cleaning of the exterior.
- Targeting Nooks and Crannies: Flour, grease, and batter inevitably find their way into the smallest crevices around the tilt mechanism, speed control knob, and attachment hub. Utilize toothpicks, cotton swabs, or a soft, dry brush to meticulously dislodge trapped debris. For greasy buildup in these tight spots, dampen a cotton swab with the vinegar and alcohol solution or a tiny amount of window cleaner to carefully clean without introducing excess moisture into sensitive areas.
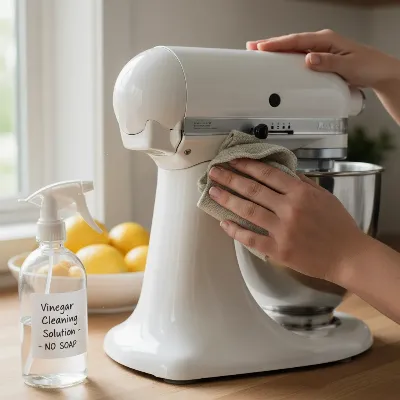 A person carefully cleaning the main body of a greasy stand mixer with a damp cloth and a DIY vinegar solution, focusing on nooks and crannies without using soap.
Attachments and Bowls: Tackling Grease Naturally
While the main unit typically benefits most from soap-free methods, cleaning attachments and bowls, especially those coated in heavy grease, requires a balance. For the most part, manufacturer instructions often recommend soap and water for thorough sanitization of attachments. However, several effective non-soap methods exist for various situations and materials.
- Hot Water Soaking: This is the foundational step for all greasy attachments and mixing bowls. Fill a sink or a large bowl with very hot water and submerge the dirty parts for 10-15 minutes. The heat helps to soften and loosen dried-on food particles and melt away a significant amount of grease, making further cleaning much easier without the need for soap.
- Baking Soda Paste for Burnished Aluminum: Burnished aluminum attachments (often recognized by their matte, non-coated silver finish) are particularly prone to oxidation, which appears as a grayish residue, especially if washed in a dishwasher or with harsh detergents. To combat this—and also to tackle stubborn grease—create a paste with baking soda and water. Gently rub this paste over the attachment, then rinse thoroughly with hot water and dry immediately. This method safely cleans without soap and helps restore shine.
- Vinegar Soak for Odors and Light Grease: For attachments that might retain odors or have a light greasy film, a soak in a solution of one part white vinegar to three parts hot water can be very effective. Submerge the attachments for about 10 minutes, then rinse well with hot water and dry completely. Vinegar is an excellent natural deodorizer and has mild degreasing properties.
- Important Considerations: It is crucial to be aware that wire whips and burnished aluminum attachments should generally never be put in a dishwasher. The harsh detergents and high heat can cause severe oxidation, black residue, or tarnishing, which can be difficult to reverse. For these, hand washing with the aforementioned hot water, baking soda, or vinegar methods is preferred to prevent damage and ensure longevity. For coated attachments or stainless steel bowls, while they are often dishwasher safe, the above soap-free methods provide gentle yet effective cleaning.
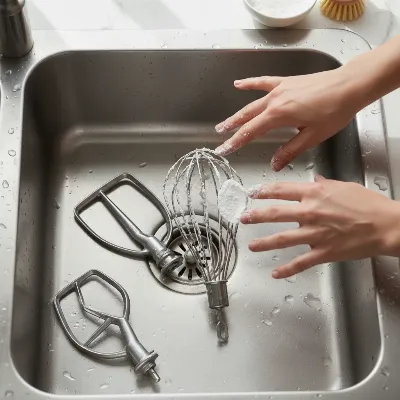 Various stand mixer attachments (beaters, whisk, dough hook) being cleaned using a baking soda paste in a kitchen sink, emphasizing natural, soap-free methods.
Post-Cleaning Care
After diligently cleaning your stand mixer using soap-free methods, the final steps are critical for preventing rust, mildew, and ensuring optimal performance. Thorough drying of all parts is non-negotiable; use a clean, dry microfiber cloth to wipe every surface, especially crevices, to remove all moisture. For burnished aluminum attachments, immediate drying is key to preventing water spots and oxidation. Once everything is completely dry, carefully reassemble your stand mixer, ensuring all attachments click securely into place. Proper post-cleaning care prolongs the life of your appliance and keeps it ready for its next culinary adventure.
Conclusion
Mastering the art of cleaning your greasy stand mixer safely without soap is an essential skill for any home baker, ensuring both hygiene and longevity for your indispensable kitchen companion. By embracing natural alternatives like warm water, vinegar, rubbing alcohol, and baking soda, you can effectively tackle stubborn grease and grime on the main unit and many attachments, protecting delicate finishes and electrical components from harsh chemicals. Regular, mindful maintenance not only keeps your mixer pristine but also guarantees its peak performance for countless delicious creations. What soap-free cleaning hack will you try first to keep your stand mixer gleaming?
Câu Hỏi Thường Gặp
How can I remove old, caked-on grease stains from my stand mixer without harsh chemicals?
For stubborn, dried-on grease, a paste made from baking soda and a small amount of water is highly effective. Apply the paste to the stains, allow it to sit for 10-15 minutes to penetrate the grease, then gently scrub with a soft brush or cloth before wiping clean with a damp cloth.
Can I use vinegar to clean all parts of my stand mixer?
White vinegar is safe for cleaning most non-porous surfaces of your Stand Mixer, especially the exterior and stainless steel bowls, as a natural degreaser and deodorizer. However, avoid submerging electrical components. For burnished aluminum attachments, use a diluted vinegar solution or baking soda paste to prevent oxidation.
What should I do if my burnished stand mixer attachment turns gray after cleaning?
The gray residue on burnished aluminum attachments is typically oxidation, often caused by dishwashing or prolonged exposure to moisture. To address this without soap, create a paste of baking soda and water, gently rub it onto the attachment, then rinse thoroughly with hot water and dry immediately to restore its shine.
Are there any parts of the stand mixer that absolutely require soap for proper cleaning?
While this guide focuses on soap-free methods, heavily soiled coated or stainless steel attachments might occasionally benefit from initial soaking in hot, soapy water for thorough sanitation, followed by a rinse. However, the main mixer body should consistently be cleaned using the non-soap methods outlined to protect its delicate mechanics and finish.