An oily puddle beneath your stand mixer indicates a common issue: grease separation within its gearbox. This problem is often fixable at home by replacing the old, separated grease with fresh, food-grade lubricant. The process involves careful disassembly, thorough cleaning of internal components, and meticulous reassembly, which can significantly extend the appliance’s lifespan and prevent costly professional repairs.
Understanding Why Your Stand Mixer Leaks
A stand mixer relies on a robust gearbox filled with specialized food-grade grease to keep its gears turning smoothly. Over time, this grease can undergo “separation,” where the oil component separates from the solidifying base, similar to an old jar of peanut butter. This liquid oil then seeps out from various points on your mixer.
Several factors contribute to grease separation and subsequent leakage. Infrequent use allows the grease to settle and separate, while overloading the mixer with dense doughs or running it at high speeds for extended periods can generate excessive heat, thinning the grease and accelerating its breakdown. Additionally, the natural aging process simply causes grease to degrade over years of service. You might notice tell-tale signs such as a few drops of oil in the mixing bowl, grease dripping from the beater shaft, or oily residue around the speed control or lock lever slots, especially if the mixer has been stored on its side.
Essential Tools and Safety Precautions
Before you begin any DIY repair on your stand mixer, prioritizing safety is paramount. Always ensure the mixer is completely unplugged from the power source to prevent accidental activation. Clear your workspace to avoid clutter, and consider wearing safety glasses to protect your eyes, as well as gloves to keep your hands clean from old grease.
To successfully re-grease your stand mixer, gather the following tools and materials:
- Screwdrivers: Both Phillips head and flathead varieties will be necessary for removing various screws and covers.
- Putty Knife or Scraper: Indispensable for removing the old, hardened grease from the gearbox.
- Pin Punch and Hammer/Mallet: Used to tap out retaining pins holding the planetary assembly.
- Food-Grade Stand Mixer Grease: This is crucial. Do not use automotive grease or other industrial lubricants; it must be specifically designed and certified as food-safe for stand mixers.
- Clean Cloths and Paper Towels: For wiping away grease and cleaning components.
- Degreaser (Food-Safe): To thoroughly clean residual grease.
- Small Containers or Plastic Bags: To keep screws and small parts organized during disassembly.
- Needle-Nose Pliers: Helpful for handling small wires or parts.
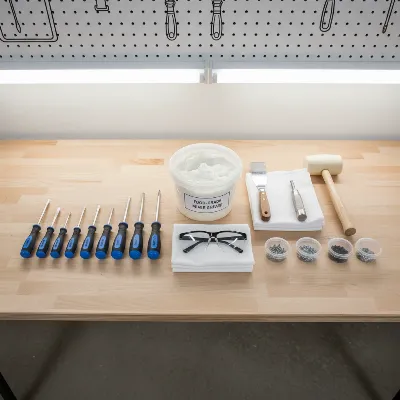 Essential tools laid out on a clean workbench for a DIY stand mixer repair, including screwdrivers, putty knife, grease, cloths, and safety glasses.
Step-by-Step DIY Grease Replacement
The core of fixing a leaking stand mixer involves replacing the old, separated grease with fresh, food-grade lubricant. This process requires patience and attention to detail, but it’s a rewarding repair that can significantly extend your mixer’s life.
Disassembly
|
Our Picks for the Best Stand Mixer in 2026
As an Amazon Associate I earn from qualifying purchases.
|
||
| Num | Product | Action |
|---|---|---|
| 1 | 3-IN-1 Electric Stand Mixer, 6.5QT Bowl 660W 10-Speed Kitchen Mixer, Household Food Mixers include Dough Hook, Beater and Whisk, Bread Cake Mixer for Baking and Most Home Cooks, Green |

|
| 2 | Stand Mixer, 6.5QT 10-Speed Tilt-Head Electric Stand Mixer, 3-In-1 Kitchen Mixer with Bowl, Dough Hook, Whisk and Beater, Food Mixer for Baking, Cake and Most Home Cooks, Pink |
|
| 3 | Hamilton Beach Electric Stand Mixer, 4 Quarts, Dough Hook, Flat Beater Attachments, Splash Guard, 7 Speeds with Whisk, Easy-Carry Top Handle, Aqua |
|
| 4 | Mini Angel Stand Mixer,10-Speed 5QT Kitchen Electric Mixer,Tilt-Head Food Mixer with Dough Hook, Wire Whisk, Flat Beater, Stainless Steel Bowl (Silver) |
|
| 5 | Stand Mixer, 9-Quart Stainless Steel Bowl, 660W Professional Power, Multiple Speed Options, Sturdy Design, Easy to Clean, Lifetime Support, SM-1550(Caramel) |
|
| 6 | 8.45 QT All Metal Stand Mixer,10 Speed Large Capacity Kitchen Mixer with Digital Timer & Tilt-Head, Electric Mixer with Whisk Dough Hook Mixing Beater for Baking,Cakes,Cookie,Bread,Salad(Silver) |
|
| 7 | Cuisinart Stand Mixer, 12 Speed, 5.5 Quart Stainless Steel Bowl, Chef’s Whisk, Mixing Paddle, Dough Hook, Splash Guard w/ Pour Spout, Periwinkle Blue, SM-50TQNAS |
|
| 8 | Stand Mixer, 6QT Electric Kitchen Mixer for Baking Cakes & Dough, LED Smart Touchscreen, 11-Speed Tilt-Head & Timer, 4 Presets, Mixer with Bowl, Dough Hook/Whisk/Beater, Green |
|
| 9 | Hamilton Beach Electric Stand Mixer, 4 Quarts, Dough Hook, Flat Beater Attachments, Splash Guard, 7 Speeds with Whisk, Easy-Carry Top Handle, Blue |
|
| 10 | Stand Mixer, 6 QT 600W Tilt-Head Dough Mixer, 6+P speed Mixers Kitchen Electric Stand Mixer with Stainless Steel Bowl, Dishwasher-Safe Dough Hook, Flat Beater, Wire Whisk, Splash Guard, Grey |
|
Carefully disassembling your mixer is the first major step. Work slowly, and keep track of all screws and parts, ideally in separate labeled containers.
- Remove the Rear Housing Cover and Power Cord Strain Relief: Begin by locating the single Phillips head screw on the mixer’s rear housing cover. Remove this screw, and the cover will typically hinge or slide off. With the cover removed, gently wiggle and pull the power cord strain relief from its opening to free the cord from the motor.
- Remove the Planetary Drip Ring: This “beauty ring” sits around the planetary shaft and helps catch minor drips. Use a flathead screwdriver to gently pry or tap it off, working carefully around its circumference as it’s often held by surface tension.
- Tap Out the Planetary Pin: The planetary assembly, where your beaters attach, is held in place by a pin. Locate the pinhole on the bottom of the planetary shaft. Using a pin punch and a hammer or mallet, carefully tap the pin out of its channel.
- Pry Off the Planetary Assembly: Once the pin is removed, the planetary assembly can be carefully pried off the mixer. This might require a little force, but avoid excessive strain to prevent damage.
- Remove Motor Housing/Gearbox Screws: With the planetary removed, you’ll see screws holding the motor housing or gearbox cover in place. Typically, there are five screws around the planetary gear area, and sometimes additional screws on the rear housing that secure the upper housing. Remove all necessary screws.
- Separate Motor Housing from Stand: Carefully lift the motor housing assembly from the main stand. This will expose the internal gears and the old grease.
Cleaning and Inspection
Once disassembled, you’ll likely encounter a significant amount of old, gunky grease. This is the material that needs to be thoroughly removed.
- Scrape Out Old Grease: Using your putty knife, meticulously scrape out all the old, separated grease from around the gears, the gearbox cavity, and the motor housing. It’s crucial to remove as much of the old grease as possible to prevent contamination of the new lubricant. You may need to manually turn the gears to access all areas. Collect the old grease in a disposable container.
- Clean Parts Thoroughly: With the bulk of the old grease removed, use a food-safe degreaser and clean cloths or paper towels to wipe down all the gears, housing interiors, and any other components that were coated in grease. Ensure all surfaces are clean and dry before proceeding.
- Inspect Gears and Seals: While cleaning, take the opportunity to inspect the gears for any visible wear, chips, or damage. Also, check any gaskets or seals for cracks or deterioration. If these appear damaged, they may need replacement for a complete fix, though this can sometimes be more complex.
 Close-up of clean, disassembled stand mixer gears ready for fresh food-grade grease application, on a white background.
Re-greasing and Reassembly
Now for the satisfying part: applying fresh grease and bringing your mixer back together.
- Apply New Food-Grade Grease: Using a clean putty knife or your gloved hand, begin packing the gearbox with fresh food-grade grease. Apply it generously to all the gears, ensuring each tooth and bearing surface is well-coated. Aim to put back approximately the same amount of grease that you removed. Rotate the gears manually to help distribute the new grease evenly throughout the assembly.
- Reattach Motor Housing: Carefully align the motor housing with the mixer stand. A bearing in the gearbox portion of the housing often needs to line up with a gear spindle. Gently press the housing back into place.
- Reinstall Planetary Assembly and Pin: Slide the planetary assembly back onto its shaft. Align the holes for the planetary pin and gently tap the pin back into place with your hammer and punch until it’s fully seated and flush.
- Replace Planetary Drip Ring: Clean any grease from the area where the drip ring sits, then firmly press the drip ring back into position around the planetary.
- Reattach Rear Housing Cover and Power Cord Strain Relief: Guide the power cord strain relief back into its opening, ensuring the cord is secure. Then, replace the rear housing cover, aligning it and screwing it back into place.
Once fully reassembled, plug your mixer in and run it on a low speed, then gradually increase to a higher speed for a few minutes with an empty bowl. Listen for any unusual noises and observe its operation. This helps distribute the new grease and ensures everything is working correctly.
Preventing Future Stand Mixer Leaks
While replacing the grease is an effective fix, adopting good practices can help prevent future leaks and prolong your stand mixer’s lifespan.
- Regular Use: Consistent use helps keep the internal grease agitated and distributed, preventing it from settling and separating. Even if you don’t bake frequently, running your mixer on a high setting for a few minutes once a month without ingredients can make a difference.
- Avoid Overloading: Be mindful of your mixer’s capacity limits, especially when working with heavy doughs. Overloading strains the motor and gears, generating excessive heat that can degrade the grease more quickly.
- Proper Storage: Always store your stand mixer upright in a cool, dry place. Storing it on its side can cause the oil to pool in unintended areas and seep out. Avoid storing it near heat sources like ovens.
- Allow Cooling: If you’re undertaking a lengthy mixing task, give your mixer a short break to cool down between batches. This prevents overheating and helps maintain grease integrity.
- Routine Maintenance: After each use, wipe down the exterior of your mixer, paying attention to the attachment hub and planetary gearbox area, to remove any food residue or grease splatters. Periodically inspect for any early signs of wear on components or slight leakage, allowing for timely intervention.
> “Preventative maintenance is the secret ingredient for stand mixer longevity. Treat your mixer like the valuable kitchen companion it is, and it will serve you faithfully for years to come.” – Chef Elena Rodriguez, Culinary Arts Instructor
Conclusion
A leaking stand mixer, though alarming, is often a manageable issue rooted in grease separation within its gearbox. By confidently tackling the DIY task of replacing old grease with fresh, food-grade lubricant, you can revitalize your appliance and save on costly professional repairs or replacements. This process involves careful disassembly, thorough cleaning, and meticulous reassembly. Beyond the fix, simple maintenance habits like regular use, avoiding overload, and proper storage are your best defense against future leaks. With a little care and attention, your trusty stand mixer will continue to be a dependable partner in crafting delicious memories in your kitchen.
What culinary masterpieces will you create with your freshly serviced stand mixer?
Frequently Asked Questions
Frequently Asked Questions
Is the leaking oil from my stand mixer harmful if it gets into food?
The grease used in stand mixers is food-grade and approved for incidental contact with food. While generally not harmful in small amounts, it can be unappetizing and may discolor light-colored preparations. The main concern is the mess and reduced lubrication for the mixer's internal components.
How often should a stand mixer be re-greased for optimal performance?
For average home use, re-greasing a stand mixer every 5 to 10 years is a good guideline, or when you notice signs of leakage or unusual noises. Heavy use or professional environments might require more frequent attention, potentially every 2-3 years, to maintain optimal performance.
Can I use any type of grease for my stand mixer's internal gears?
No, you must use specific food-grade grease designed for stand mixers. Regular automotive or industrial greases are not safe for contact with food and can also damage your mixer's internal components. Always purchase grease explicitly labeled for stand mixer use to ensure safety and compatibility.
What should I do if my stand mixer continues to leak after re-greasing?
If your mixer still leaks after replacing the grease, it might indicate other issues such as damaged or improperly seated gaskets/seals, or significant wear to internal components like gears. In such cases, consulting a professional repair service is advisable for a thorough diagnosis and repair.
What are the primary reasons a stand mixer starts to leak grease?
A stand mixer typically leaks grease due to separation of the food-grade lubricant within its gearbox. This separation is often caused by infrequent use, which allows the grease to settle, or by overloading the mixer, which generates excessive heat and thins the grease. The natural aging process of the grease also contributes to its degradation over time.
How to Re-Grease a Leaking Stand Mixer
This guide provides a step-by-step process to replace old, separated grease with fresh, food-grade lubricant in your stand mixer, fixing leaks and extending its lifespan.
Carefully remove the rear housing cover, power cord strain relief, planetary drip ring, and planetary assembly. Then, remove the screws holding the motor housing/gearbox and separate it from the stand. Keep all screws and small parts organized in containers.
Scrape out all old, separated grease from the gearbox cavity, gears, and motor housing using a putty knife. Thoroughly clean all components with a food-safe degreaser and cloths. Inspect gears, gaskets, and seals for any wear or damage that might require replacement.
Generously pack the gearbox with fresh food-grade grease, ensuring all gear teeth and bearing surfaces are well-coated. Aim to apply approximately the same amount of grease that was removed. Manually rotate the gears to distribute the new lubricant evenly.
Carefully reattach the motor housing, planetary assembly, and planetary pin. Replace the planetary drip ring, then guide the power cord strain relief back into its opening. Finally, reattach the rear housing cover and secure it with its screw.
Plug in the reassembled mixer and run it on a low speed, gradually increasing to a higher speed for a few minutes with an empty bowl. Listen for any unusual noises and observe its operation to ensure the new grease is distributed and everything is working correctly.
Get our weekly buyer guide
Practical specs, not advice. Unsubscribe anytime.
I was so frustrated with my KitchenAid mixer leaving oily puddles on my counter. This guide was a lifesaver! I followed the steps for replacing the old grease with fresh, food-grade lubricant, and it worked perfectly. My mixer is running like new again, and I saved a ton of money not having to take it in for a professional repair.
Great advice here. I’d noticed my mixer was starting to get a bit sluggish and then the leakage started. The explanation about grease separation made so much sense. Disassembly was a bit intimidating at first, but taking my time with the cleaning of internal components really paid off. It’s a solid fix for a common problem.
I appreciate the detailed instructions for fixing the leaking issue. I managed to get the old grease out and put new in, but the reassembly was a bit tricky for me. I think I might have overtightened something because it’s a little noisier now. Still, it’s not leaking anymore, so that’s a win.
My old Hobart mixer started leaking after years of heavy use, and I thought it was done for. This guide gave me the confidence to tackle the repair myself. The part about understanding why the mixer leaks was really helpful in diagnosing the problem. It’s amazing how much life you can get out of these machines with a little maintenance.