Stand mixers typically need to be regreased every 2-3 years, or more frequently if used heavily. This maintenance task is crucial for the longevity and optimal performance of your appliance, preventing wear and tear on internal gears and reducing operational noise. The frequency can vary based on usage intensity and the specific model of your stand mixer.
Why Regreasing Your Stand Mixer is Essential
The internal gears of a stand mixer are constantly under stress, especially when mixing dense doughs or batters. Over time, the original grease can dry out, harden, or become contaminated with food particles. This degradation leads to increased friction, which can cause gears to wear down prematurely, generate excessive heat, and produce loud grinding noises. Regular regreasing ensures that all moving parts are adequately lubricated, allowing them to operate smoothly and efficiently. For best stand mixer roundups on this site.
Neglecting to regrease your stand mixer can lead to costly repairs or even complete failure of the appliance. A well-lubricated mixer runs quieter, performs better, and has a significantly longer lifespan. It’s a small investment of time that yields substantial benefits in terms of performance and durability.
Signs Your Stand Mixer Needs Regreasing
Several indicators suggest your stand mixer is due for a regrease. The most common sign is an increase in operational noise, particularly a grinding or squealing sound during use. Another tell-tale sign is the presence of gray or black grease leaking from the mixer head, which indicates the existing lubricant has broken down and is no longer effective. You might also notice the mixer struggling more than usual with tasks it once handled easily, or feeling warmer to the touch after short periods of use.
- Increased grinding or squealing noises during operation.
- Visible gray or black grease leaking from the mixer head.
- The mixer feels unusually warm after short periods of use.
- Reduced power or difficulty mixing dense ingredients.
- A noticeable change in the smoothness of the mixer’s action.
Choosing the Right Grease for Your Stand Mixer
|
Our Picks for the Best Stand Mixer in 2026
As an Amazon Associate I earn from qualifying purchases.
|
||
| Num | Product | Action |
|---|---|---|
| 1 | Stand Mixer, 6.5QT 10-Speed Tilt-Head Electric Stand Mixer, 3-In-1 Kitchen Mixer with Bowl, Dough Hook, Whisk and Beater, Food Mixer for Baking, Cake and Most Home Cooks, Pink |

|
| 2 | Cuisinart Stand Mixer, 12 Speed, 5.5 Quart Stainless Steel Bowl, Chef’s Whisk, Mixing Paddle, Dough Hook, Splash Guard w/ Pour Spout, Periwinkle Blue, SM-50TQNAS |
|
| 3 | Stand Mixer, 6 QT 600W Tilt-Head Dough Mixer, 6+P speed Mixers Kitchen Electric Stand Mixer with Stainless Steel Bowl, Dishwasher-Safe Dough Hook, Flat Beater, Wire Whisk, Splash Guard, Grey |
|
| 4 | 8.45 QT All Metal Stand Mixer,10 Speed Large Capacity Kitchen Mixer with Digital Timer & Tilt-Head, Electric Mixer with Whisk Dough Hook Mixing Beater for Baking,Cakes,Cookie,Bread,Salad(Silver) |
|
| 5 | Hamilton Beach Electric Stand Mixer, 4 Quarts, Dough Hook, Flat Beater Attachments, Splash Guard, 7 Speeds with Whisk, Easy-Carry Top Handle, Aqua |
|
| 6 | 3-IN-1 Electric Stand Mixer, 6.5QT Bowl 660W 10-Speed Kitchen Mixer, Household Food Mixers include Dough Hook, Beater and Whisk, Bread Cake Mixer for Baking and Most Home Cooks, Green |
|
| 7 | Hamilton Beach Electric Stand Mixer, 4 Quarts, Dough Hook, Flat Beater Attachments, Splash Guard, 7 Speeds with Whisk, Easy-Carry Top Handle, Blue |
|
| 8 | Stand Mixer, 9-Quart Stainless Steel Bowl, 660W Professional Power, Multiple Speed Options, Sturdy Design, Easy to Clean, Lifetime Support, SM-1550(Caramel) |
|
| 9 | Stand Mixer, 6QT Electric Kitchen Mixer for Baking Cakes & Dough, LED Smart Touchscreen, 11-Speed Tilt-Head & Timer, 4 Presets, Mixer with Bowl, Dough Hook/Whisk/Beater, Green |
|
| 10 | Mini Angel Stand Mixer,10-Speed 5QT Kitchen Electric Mixer,Tilt-Head Food Mixer with Dough Hook, Wire Whisk, Flat Beater, Stainless Steel Bowl (Silver) |
|
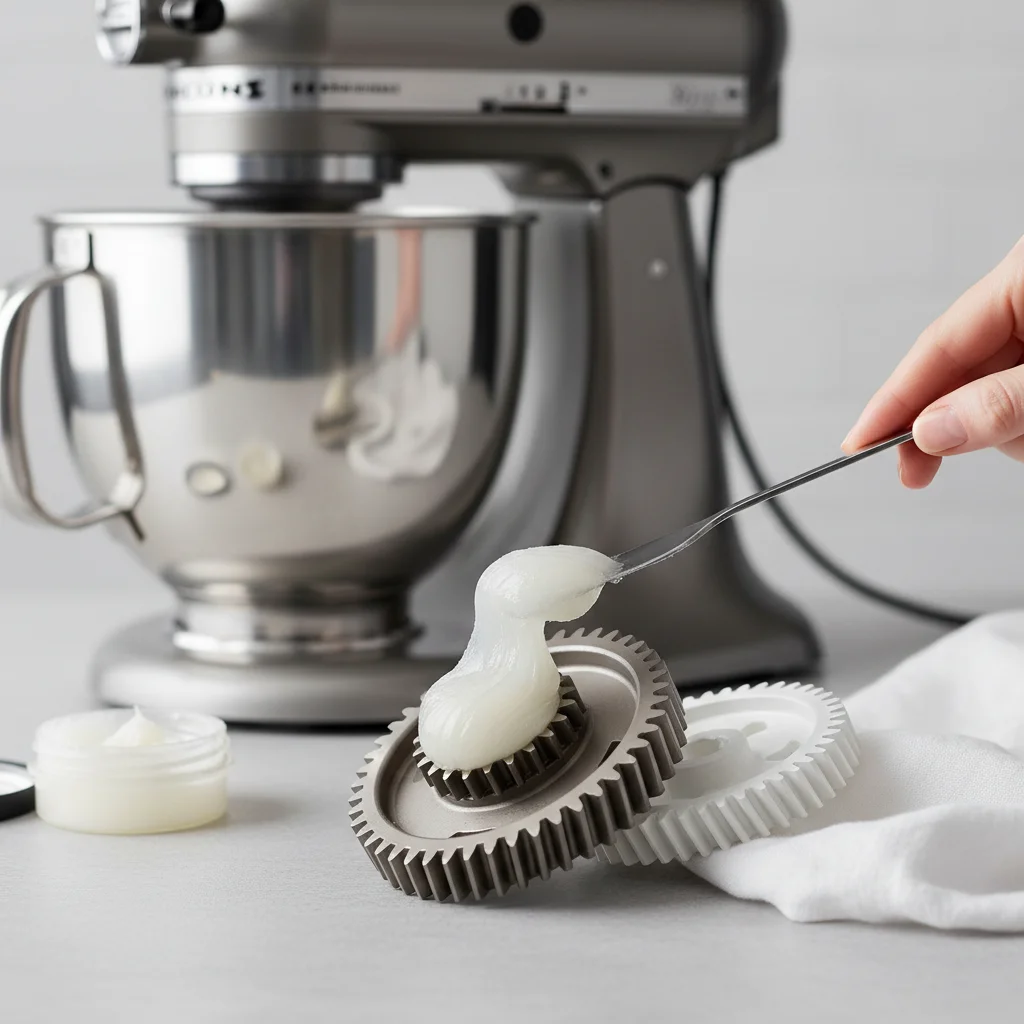
When regreasing your stand mixer, it’s critical to use food-grade grease. This type of grease is safe for incidental food contact, which is important given the mixer’s proximity to food preparation. Standard automotive or industrial greases are not suitable as they can contain harmful chemicals. Look for NSF H1 certified food-grade grease, often made from mineral oil or silicone bases. These greases are designed to withstand the temperatures and pressures within a stand mixer while remaining non-toxic.
Always consult your stand mixer’s manual for specific recommendations on grease type. Some manufacturers may specify a particular brand or type of food-grade lubricant to ensure compatibility and optimal performance. Using the wrong type of grease can damage internal components or void your warranty.
The Regreasing Process: A Step-by-Step Overview
Regreasing a stand mixer is a moderately involved DIY task that requires some mechanical aptitude. First, you’ll need to disassemble the mixer head to access the internal gears. This typically involves removing the outer casing and carefully detaching the motor and gear assembly. Once exposed, you’ll need to thoroughly clean out all the old, hardened grease using a degreaser and lint-free cloths. This step is crucial to prevent contamination of the new grease.
After cleaning, apply a generous amount of new food-grade grease to all gears, bearings, and moving parts. Ensure an even coating, but avoid overpacking, as this can create resistance. Reassemble the mixer carefully, making sure all screws and components are securely fastened. It’s advisable to run the mixer on a low speed for a few minutes after reassembly to help distribute the new grease evenly.
Professional Regreasing vs. DIY
While regreasing can be a DIY project for those comfortable with basic tool use and disassembly, it’s also an option to have it professionally serviced. Many appliance repair shops offer stand mixer maintenance, including regreasing. The cost of professional service can vary but typically ranges from $50-$100, depending on the complexity of the mixer and labor rates in your area. This can be a worthwhile investment if you’re not confident in your ability to perform the task yourself, or if your mixer is still under warranty and you prefer professional handling.
For those who choose the DIY route, there are numerous online tutorials and videos available that provide detailed, model-specific instructions. Always prioritize safety and disconnect the mixer from power before beginning any maintenance.
Get our weekly buyer guide
Practical specs, not advice. Unsubscribe anytime.
I’m so glad I found this! My KitchenAid has been making a weird grinding noise lately, especially when I’m making bread dough. I thought it was on its last legs, but after reading this, I realize it’s probably just the grease. I’m going to try regreasing it myself this weekend. Hopefully, it’ll quiet down and last a few more years.
I appreciate the info on how often to regrease, but I wish there were more specific instructions for different models. My Cuisinart mixer seems a bit different to open up than what’s implied. I’m a bit hesitant to just dive in without clearer guidance for my specific appliance. It’s a good general overview though.
Spot on! I’ve been baking professionally for years, and I can’t stress enough how important regular maintenance is. Especially for those of us who mix dense doughs daily. Neglecting the grease is a surefire way to shorten your mixer’s lifespan and end up with costly repairs. This article really highlights the key points.
This was super helpful. I’ve had my stand mixer for about four years now and never even thought about the grease. I use it pretty heavily for all my baking projects, from cookies to cakes. It’s still running fine, but I’m definitely going to check it out soon to prevent any issues down the line. Better safe than sorry!